前面铺垫了这么多,终于开始实现签名反篡改的功能了。
下载 yGuard 源码(https://github.com/yWorks/yGuard), 然后先修改一处错误 ,在 settings.gradle 中定义的项目名是错的(和github上的名字不一样,git clone 下载会使用 github 定义的名字yGuard,估计作者本地建的项目名是 yguard),将里面的 rootProject.name = 'yguard' 改成 rootProject.name = 'yGuard' 即可。
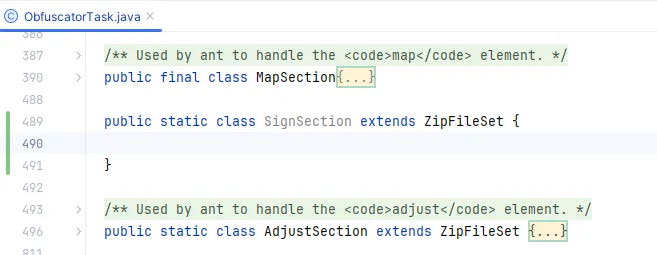
一开始的想法是要参考 <adjust>实现,所以连代码都挨着 AdjustSection 类,写在了 ObfuscatorTask 内部:
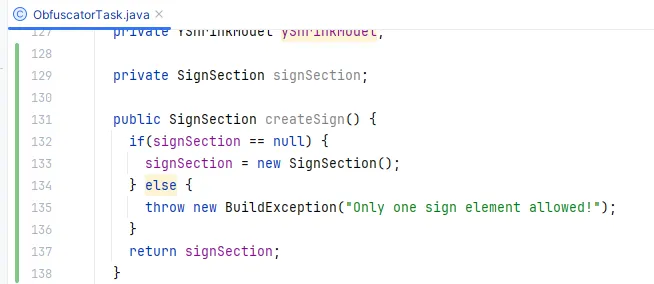
假设我们允许配置一个 <sign>元素,在 ObfuscatorTask 创建变量和对应的 createSign 方法:
接下来先把 signSection 安排到我们在 混淆技术研究笔记(六)如何基于yGuard实现? 中指定的地方,当时指定了一个地方获取要签名的类:
1
2
3
4
for (AdjustSection as : adjustSections)
一个读取混淆前后名字和内容的地方:
1
2
3
4
5
6
7
8
9
10
11
12
if (inName.endsWith(CLASS_EXT))if (fileFilter == null || fileFilter.accepts(inName)){ClassFile cf = ClassFile.create(inStream);String outName = createClassFileName(inName, cf) + CLASS_EXT;
还有一个能写入到jar包中的地方:
1 2 byte []) array[1 ]);
下面详细介绍这部分实现。
1. 实现配置签名指定的类 虽然想参考<adjust>下面的方法:
1
2
3
4
for (AdjustSection as : adjustSections)
但是因为 <adjust> 获取的是资源文件,不是类,直接 copy 来用不合适,既然是获取类,就直接参考 <class> 下面的 <patternset>,找到 <class> 的实现:
1
2
public class ClassSection extends PatternMatchedClassesSection implements Mappable {
从这里发现只要继承 PatternMatchedClassesSection 就能使用 addEntries( Collection entries, ZipFileSet zf)获取要签名的类,因此修改前面定义的 SignSection:
1
2
3
4
5
6
public static class SignSection extends PatternMatchedClassesSection {@Override public void addEntries ( final Collection entries, final String matchedClass ) {
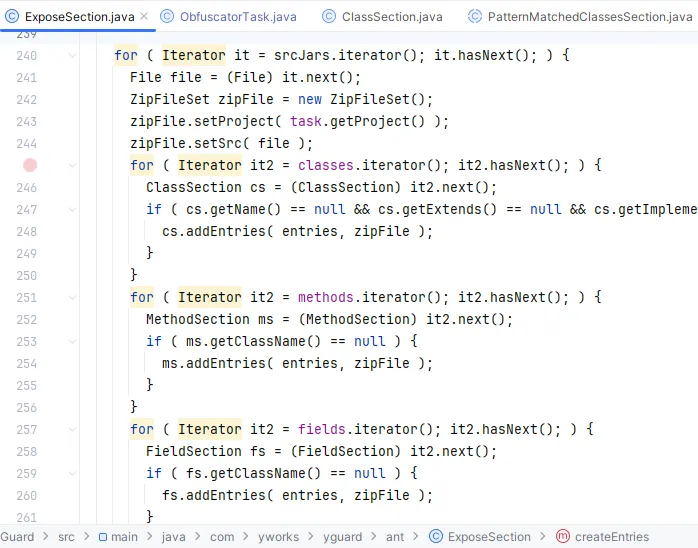
继承后必须实现抽象方法 addEntries,这个方法在PatternMatchedClassesSection 中被调用了,追踪public void addEntries( Collection entries, ZipFileSet zf)方法调用的位置发现在 ExposeSection (对应 <keep> 标签)中存在下面的代码:
这里按顺序把 <class>,<method>,<field>等元素中的配置添加到了外部的 entries 中,这个变量存储了 <keep> 中混淆的全部配置。追踪 ExposeSection#createEntries 方法发现在 ObfuscatorTask#execute 中执行的,那么我们第一个获取签名类的地方就在这里。
在 SignSection 中添加和 expose.createEntries 一样的方法,并且copy里面的部分代码:
1
2
3
4
5
6
7
8
9
10
11
12
13
14
15
16
17
18
19
20
21
22
23
24
public static class SignSection extends PatternMatchedClassesSection {protected Project project;private Collection entries = new ArrayList ( 20 );public SignSection ( final Project project ) {this .project = project;@Override public void addEntries ( final Collection entries, final String matchedClass ) {public Collection createEntries ( Collection srcJars ) throws IOException {for ( Iterator it = srcJars.iterator(); it.hasNext(); ) {File file = (File) it.next();ZipFileSet zipFile = new ZipFileSet ();return entries;
由于参考代码中 zipFile.setProject(project); 这里需要 Project 类,因此修改了构造方法,增加了 Project 参数,同时修改 createSign 方法:
1
2
3
4
5
6
7
8
public SignSection createSign () {if (signSection == null ) {new SignSection (getProject());else {throw new BuildException ("Only one sign element allowed!" );return signSection;
继续参考前面的 expose 调用的位置,增加 signSection 代码:
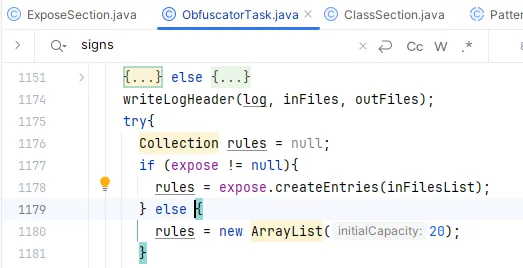
1
2
3
4
5
6
7
8
9
if (expose != null ){else {new ArrayList (20 );if (signSection != null ) {
先不要继续其他的逻辑,完成一个功能后先测试验证是否正确,没问题后在继续。
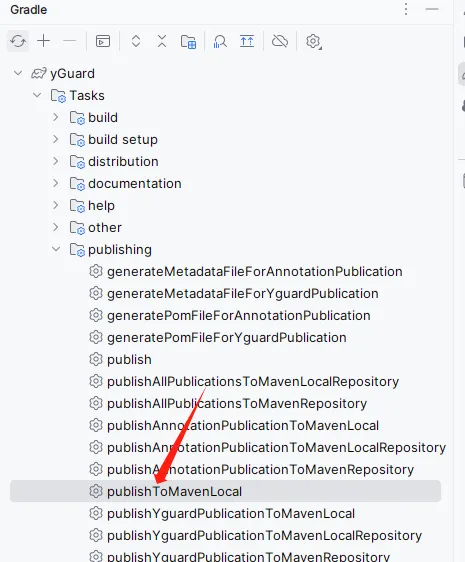
2. 发个小版本测试(1)的功能 yGuard 中gradle.properties 当前指定的版本如下:
1
2
VERSION_MAJOR =4.0 VERSION_MINOR =1-SNAPSHOT
既然是快照版就不改版本号了,在 build.gradle 的 publishing 下面的 repositories 中添加 mavenLocal() 发布到本地:
1
2
3
4
5
6
7
8
9
10
11
12
13
publishing {repositories {'https://oss.sonatype.org/service/local/staging/deploy/maven2'
还要注意本文开头修改的 settings.gradle 配置。
刷新 Gradle 配置,然后点击 publishToMavenLocal :
如果jdk8编译出错可以刷新gradle配置试试
将 yguard-module-parent 中 module-yguard 的依赖改为快照版:
1 2 3 4 5 <dependency > <groupId > com.yworks</groupId > <artifactId > yguard</artifactId > <version > 4.0.1-SNAPSHOT</version > </dependency >
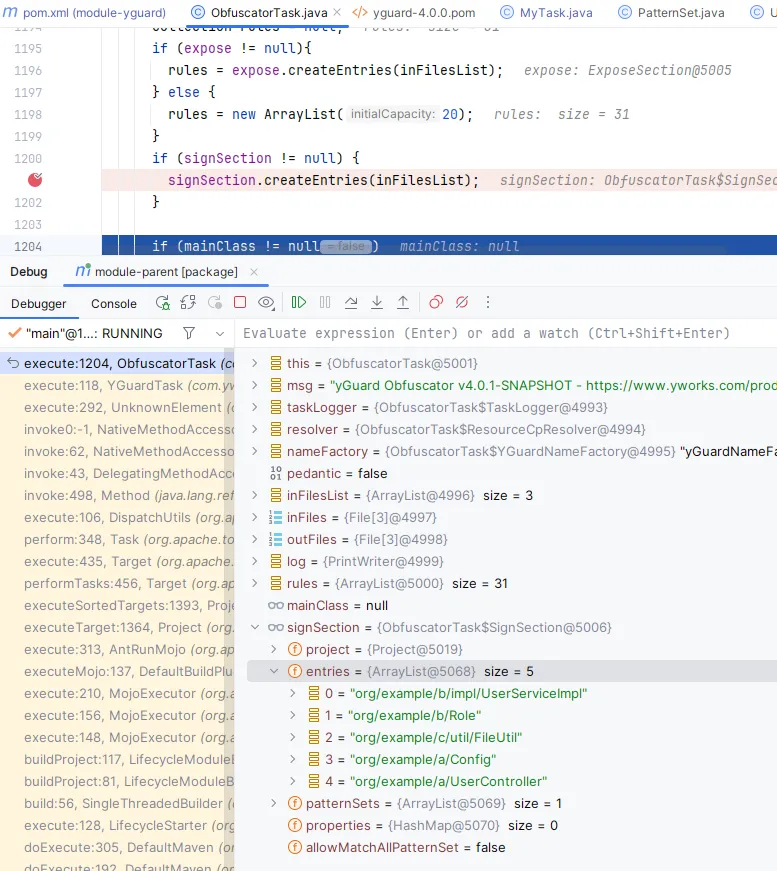
在 signSection.createEntries(inFilesList); 行添加断点,在 <rename>标签下面添加 <sign/>:
1 2 3 4 5 6 7 8 9 10 <rename logfile ="${project.build.directory}/yguard.log.xml" replaceClassNameStrings ="true" > <sign > <patternset > <include name ="org.example.a." /> <include name ="org.example.b." /> <include name ="org.example.c.util.FileUtil" /> </patternset > </sign >
右键debug运行package打包,代码运行过断点这里后可以看到包含的类:
这里说明我们已经获取到混淆前要进行签名的类了,我们继续进行后续的操作。
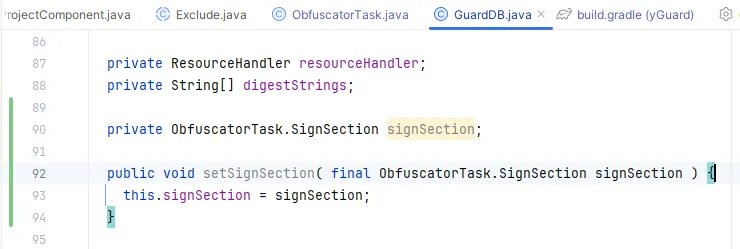
3. 记录混淆后的类信息 后面两处关键的地方都在 GuardDB中,这个对象在 ObfuscatorTask 中初始化和调用的,从这里先把 SignSection 设置到 GuardDB 中:
在使用前set进去:
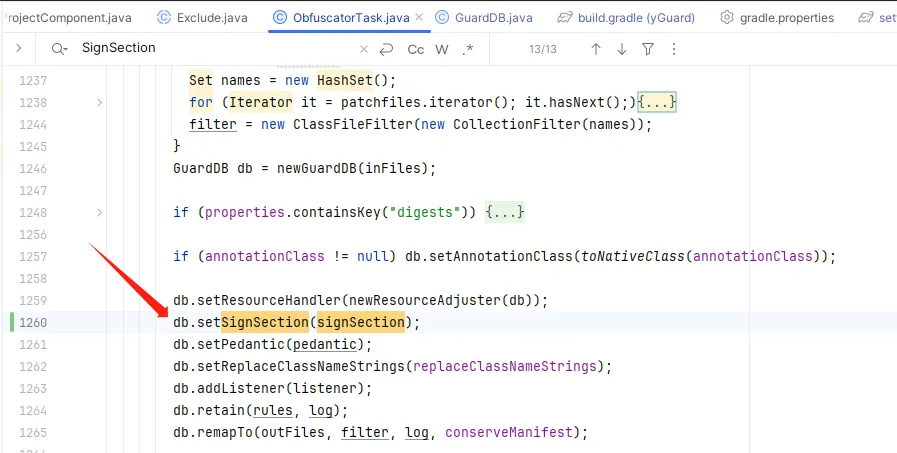
接下来就可以在 GuardDB 中使用了:
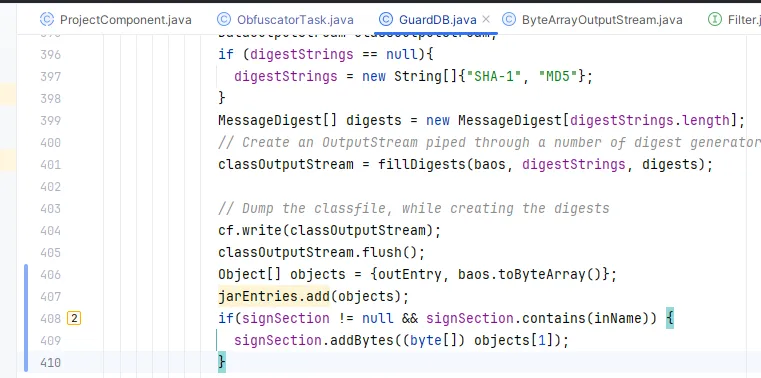
这里增加了406~410行的代码,需要给 signSection 添加两个方法:
1
2
3
4
5
6
7
8
9
10
11
12
13
14
15
16
public static class SignSection extends PatternMatchedClassesSection {protected Project project;private Collection entries = new ArrayList <>(20 );private List<byte []> bytes = new ArrayList <>(20 );public boolean contains (String name) {return entries.contains(name);public void addBytes (byte [] bytes) {this .bytes.add(bytes);
这样就拿到了所有混淆后的数据,接下来就是计算签名并写入到jar包中。
4. 签名并写入jar包 在 混淆技术研究笔记(四)反篡改介绍 中我们使用 hutool 的工具类实现了私钥加密的方法,我们这里直接用,首先添加 hutool 的依赖,在 build.gradle 中添加依赖:
1
2
3
4
5
6
7
8
dependencies {project (':annotation' )project (':annotation' )'org.ow2.asm:asm:9.2' 'org.apache.ant:ant:1.10.12' 'cn.hutool:hutool-all:5.7.22' 'junit:junit:4.13-beta-3'
新增加的 implementation 'cn.hutool:hutool-all:5.7.22'。刷新 gradle,然后在 SignSection 中实现签名和写入 jar 的方法,先增加一个属性用于设置写入的文件名:
1
2
3
4
5
6
7
8
9
private String name = "sign" ;public void setName ( final String name ) {this .name = name;public String getName () {return name;
然后是根据一定算法计算签名:
1
2
3
4
5
6
7
8
9
10
11
12
13
14
15
16
17
18
19
20
21
22
23
24
25
26
27
28
public byte [] sign() {if (entries.size() != bytes.size()) {throw new BuildException ("Number of entries and bytes must be equal!" );new ArrayList <>(bytes.size());MD5 md5 = new MD5 ();for (final byte [] data : bytes) {StringBuffer sb = new StringBuffer ();for (final String sign : signs) {return encryptHex(sb.toString()).getBytes(StandardCharsets.UTF_8);private String encryptHex (String str) {String home = System.getProperty("user.home" );String privateKeyPath = home + File.separator + ".yguard" + File.separator + "license-keys.pri" ;RSA rsa = new RSA (FileUtil.readBytes(privateKeyPath), null );byte [] bytes = rsa.encrypt(str, StandardCharsets.UTF_8, KeyType.PrivateKey);return HexUtil.encodeHexStr(bytes);
注意这里会使用私钥,私钥在 混淆技术研究笔记(四)反篡改介绍 中有示例代码可以生成。
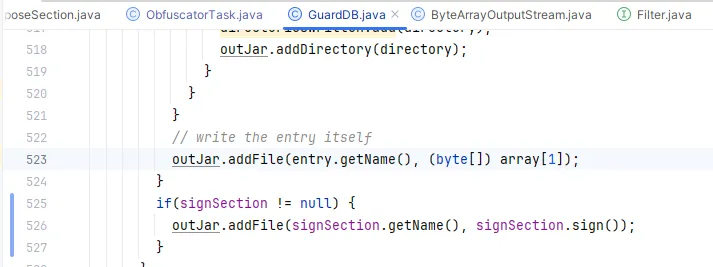
修改 GuardDB 调用上面的方法:
接下来是测试功能。
5. 测试完整功能 打包到本地maven仓库,发现前面中文注释由于编码问题有乱码,移除后重新发布。
在 module-yguard 中debug运行,在写入jar的地方断点看看效果。
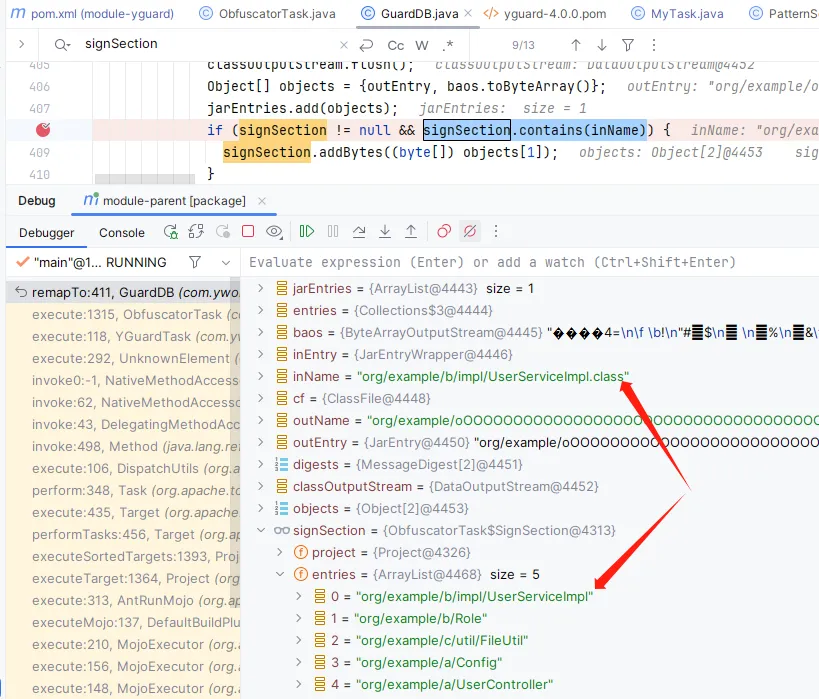
发现 inName 包含 .class 后缀导致无法匹配,因此这里去掉最后的 .class 后缀再进行匹配:
1
2
3
if (signSection != null && signSection.contains(inName.substring(0 , inName.length() - 6 ))) {byte []) objects[1 ]);
改完发布再次测试到签名时,又发现了新问题:
此时要签名的文件有5个,但是bytes只有2个,说明我们需要的文件还没获取全。
这就涉及到一个顺序问题了,我们目前的实现会在所有 <inoutpair> 配置的 jar 包上执行一遍,我们实现的又是多模块混淆,因此想要签名获取所有的文件,就只能在最后一个文件中写入签名信息,只有最后一个的时候是全的,因此我们需要 <sign> 能指定要给哪个 jar 包添加签名,还要修改对应 jar 包为最后一个 <inoutpair> (也可以默认写入最后一个 <inoutpair> 配置的 jar 包,但是这种隐藏的方式还要特别强调才不容易出错,不如更明确的指定出来)。
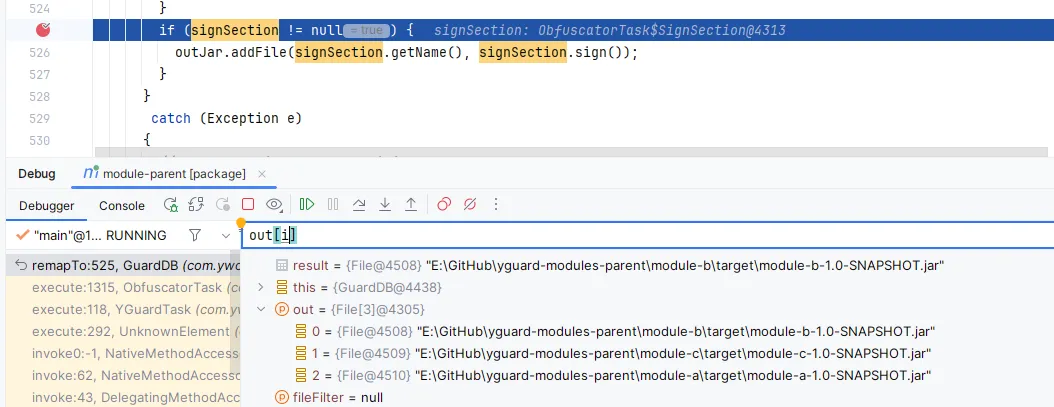
观察这里的代码可以看到 out[i] 代表了当前处理的那个 jar 包,而且是生成的 jar,这里是 File 类型,因此我们可以在 <sign> 中指定 jar 文件,改动如下:
1
2
3
4
5
6
7
8
9
10
11
public static class SignSection extends PatternMatchedClassesSection {private File jar;public File getJar () {return jar;public void setJar ( final File jar ) {this .jar = jar;
修改 GuardDB 中写入的地方,要匹配文件名:
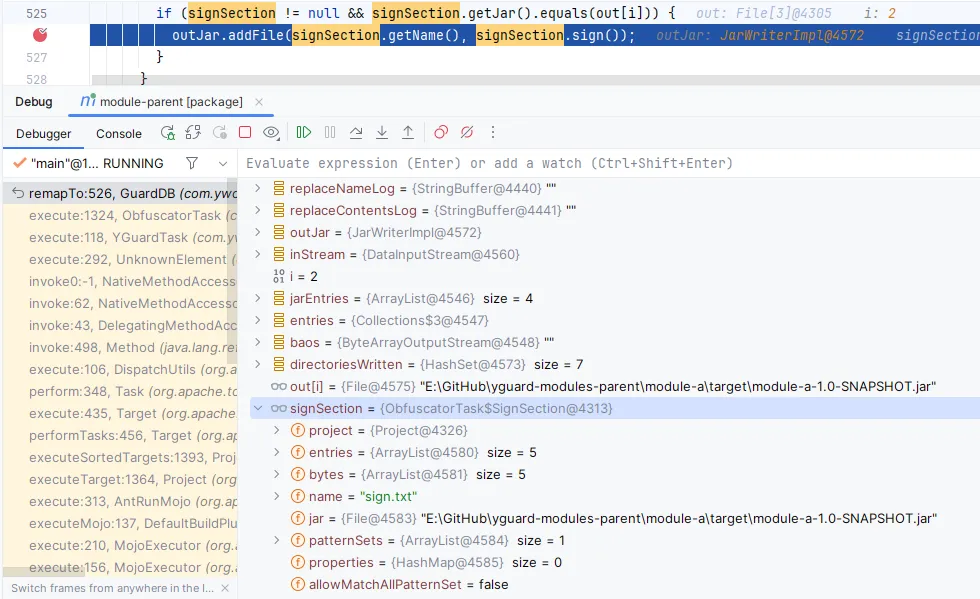
1
2
3
if (signSection != null && signSection.getJar().equals(out[i])) {
发布后,修改 <sign> 配置如下:
1 2 3 4 5 6 7 <sign name ="sign.txt" jar ="..\module-a\target\module-a-${project.version}.jar" > <patternset > <include name ="org.example.a." /> <include name ="org.example.b." /> <include name ="org.example.c.util.FileUtil" /> </patternset > </sign >
这里指定 jar 为最后一个 <inoutpair> 的 out 值:
1 2 3 4 5 6 <inoutpair in ="..\module-b\target\module-b-${project.version}.jar" out ="..\module-b\target\module-b-${project.version}.jar" /> <inoutpair in ="..\module-c\target\module-c-${project.version}.jar" out ="..\module-c\target\module-c-${project.version}.jar" /> <inoutpair in ="..\module-a\target\module-a-${project.version}.jar" out ="..\module-a\target\module-a-${project.version}.jar" />
如果一切正常,就会写入到 module-a 中,再次 DEBUG:
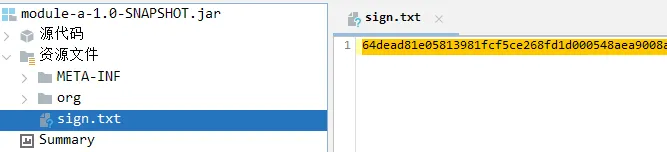
这次一切正常,执行完成后,打开 module-a 的 jar 包查看:
签名成功的写入到了 jar 包中,签名的功能到这里就实现完成了。
有了签名后,想要起作用,还需要在运行时对 jar 包内容的进行反篡改校验,这部分内容在 混淆技术研究笔记(四)反篡改介绍 有介绍,需要依赖具体的运行环境才能测试,这里就不具体实现了。
整个系列的主要内容和过程已经呈现出来了,后面还会有一篇最后的总结,会从前面几篇提取一些内容摘抄出来,只要看过前面这八篇,第九篇总结也没必要看。因为第九篇只能在微信公众号查看(搜索 MyBatis),并且最后一篇是付费文章。如果你觉得这个系列对你有帮助,可以多多转发,也可以付费支持。