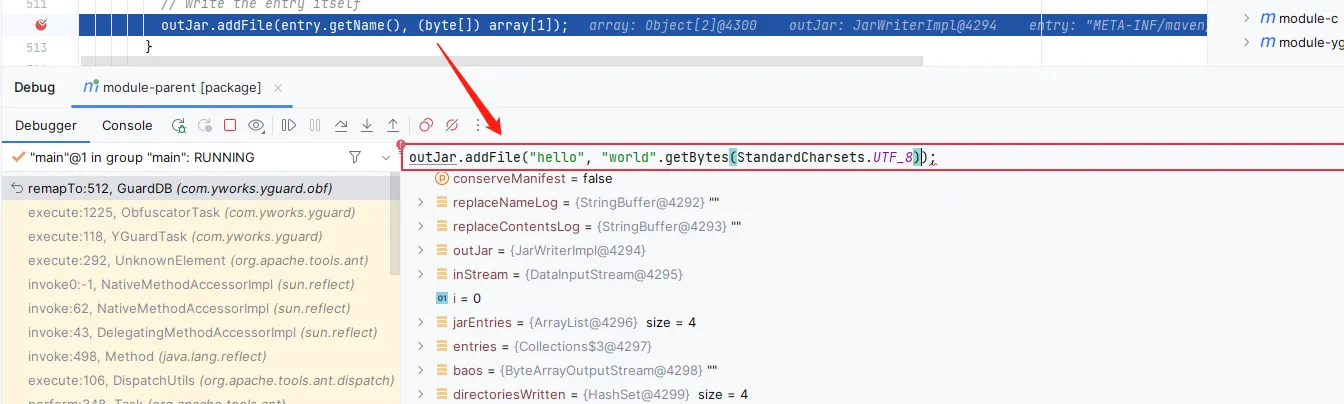
(六)如何基于yGuard实现?

确定参考 <adjust> 作为入口后,就需要详细了解这部分代码的逻辑。

需要看yguard源码了,你会如何阅读一个完全不了解的源码?

我通常的策略都是找一个目标,添加代码依赖,写好demo,debug跟踪代码看。如果漫无目的的看,很难串起来整个流程,范围太大也容易迷失。

先在配置中增加 <adjust> 配置:

1
2
3
<adjust replacePathPolicy="lenient">
<include name="**.*"/>
</adjust>

最快定位代码位置的方式就是搜索,可以搜 adjust,也可以搜 replacePathPolicy,搜索后发现了 AdjustSection 内部类(IDEA用ctrl+shift+num1标记),在 ObfuscatorTask 中,从名字来看这个是混淆的任务,对应的就是 <rename> 标签。在这个类中发现了 List<AdjustSection> adjustSections,然后搜索 adjustSections,发现几处使用的地方:

1
2
3
4
5
6
7
try {
for (AdjustSection section : adjustSections) {
section.prepare(this);
}
} catch (BuildException be) {
throw new BuildException(be.getMessage(), be.getLocation());
}

这是在准备什么东西,还没到关键的位置,继续往下找:

1
2
3
4
for (AdjustSection as : adjustSections)
{
as.createEntries(inFilesList);
}

从这里看到,<adjust>会根据配置的 include 配置找到要处理的类,这个方法有用,我可以使用他来匹配要需要签名的类,顺手打个标记(ctrl+shitf+num2),再继续找:

1
2
3
4
5
6
7
8
9
public boolean filterName( final String inName, final StringBuffer outName ) {
for(AdjustSection as : adjustSections) {
if (as.contains(inName)) {
filterNameImpl(inName, outName, as);
return true;
}
}
return false;
}

这里似乎在处理文件名,如果是前面要处理的文件,这里通过 StringBuffer outName 处理的文件名,鼠标滚轮点击该方法,追踪到调用的位置,在 GuardDB 中的 remapTo 方法里面:

1
2
3
4
5
6
7
8
9
10
11
12
13
14
15
16
if(resourceHandler != null && resourceHandler.filterName(inName, outNameBuffer))
{
outName = outNameBuffer.toString();
if(!outName.equals(inName))
{
replaceNameLog.append(" <resource name=\"");
replaceNameLog.append(ClassTree.toUtf8XmlString(inName));
replaceNameLog.append("\" map=\"");
replaceNameLog.append(ClassTree.toUtf8XmlString(outName));
replaceNameLog.append("\"/>\n");
}
}
else
{
outName = classTree.getOutName(inName);
}

这里会使用改后的文件名,那么改后文件名的生效肯定是在这里,这里可能会有写入jar的操作,这非常关键,但是我们先回到前面继续查找 adjustSections,发现了最后一处:

1
2
3
4
5
6
7
8
9
10
11
public boolean filterContent(InputStream in, OutputStream out, String resourceName) throws IOException
{
for(AdjustSection as : adjustSections)
{
if(filterContentImpl(in, out, resourceName, as))
{
return true;
}
}
return false;
}

这里是修改文件内容的地方,滚轮点击找调用位置,发现在 GuardDB 中的 remapTo 中的代码:

1
2
3
4
5
6
7
8
9
10
11
12
13
14
15
if(resourceHandler == null || !resourceHandler.filterContent(inStream, dataOutputStream, inName))
{
byte[] bytes = new byte[(int)size];
inStream.readFully(bytes);

// outName = classTree.getOutName(inName);
// Dump the data, while creating the digests
dataOutputStream.write(bytes, 0, bytes.length);
}
else
{
replaceContentsLog.append(" <resource name=\"");
replaceContentsLog.append(ClassTree.toUtf8XmlString(inName));
replaceContentsLog.append("\"/>\n");
}

这里修改的文件内容,修改的内容最后会写入jar,继续往下看,就发现了下面代码:

1
jarEntries.add(new Object[]{outEntry, baos.toByteArray()});

往下搜索 jarEntries 发现了下面代码:

1
2
3
4
5
6
7
8
9
10
11
12
13
14
15
16
17
18
for (int j = 0; j < jarEntries.size(); j++){
Object[] array = (Object[]) jarEntries.get(j);
JarEntry entry = (JarEntry) array[0];
String name = entry.getName();
// make sure the directory entries are written to the jar file
if (!entry.isDirectory()){
int index = 0;
while ((index = name.indexOf("/", index + 1))>= 0){
String directory = name.substring(0, index+1);
if (!directoriesWritten.contains(directory)){
directoriesWritten.add(directory);
outJar.addDirectory(directory);
}
}
}
// write the entry itself
outJar.addFile(entry.getName(), (byte[]) array[1]);
}

原来这里通过 outJar 就可以写入文件,而且也不必存在已有的文件,直接加个新的也可以,在 outJar.addFile 这行加个断点,clean 代码,然后在 package 上右键 debug(注意,需要在 pom.xml的dependencies中添加yguard依赖,然后定位到上面位置加断点):

这种方式是可以调试maven插件的,debug进入这里后,在表达式中执行代码,添加一个文件试试是否生效:

直接关闭断点执行完成,然后打开当时处理的module-b的jar包:

很容易就成功了,比预想的要顺利一些。

在后续的处理过程中,我写代码还有一个特点,不考虑太多(说明考虑了一点)的设计,先用最直接的手段实现功能,等功能完成后再去全局设计进行重构调整。如果一上来就想着如何设计,万一最后行不通就白费了,而且设计没有尽头,想要完美的设计可能需要纠结很久才有结果,在这种重构调整比较容易的情况下,先动手,后设计。

上面解决了最难的写入jar包的问题,再次查看 outJar 的上下文时,关注到了对应的 inJar,查看 remapTo 方法发现下面的代码:

1
2
3
4
5
6
7
8
9
10
11
12
13
14
15
16
17
18
19
20
21
22
23
24
25
26
27
28
if (inName.endsWith(CLASS_EXT))
{
if (fileFilter == null || fileFilter.accepts(inName)){
// Write the obfuscated version of the class to the output Jar
ClassFile cf = ClassFile.create(inStream);
fireObfuscatingClass(Conversion.toJavaClass(cf.getName()));
cf.remap(classTree, replaceClassNameStrings, log);
String outName = createClassFileName(inName, cf) + CLASS_EXT;
JarEntry outEntry = new JarEntry(outName);

DataOutputStream classOutputStream;
if (digestStrings == null){
digestStrings = new String[]{"SHA-1", "MD5"};
}
MessageDigest[] digests = new MessageDigest[digestStrings.length];
// Create an OutputStream piped through a number of digest generators for the manifest
classOutputStream = fillDigests(baos, digestStrings, digests);

// Dump the classfile, while creating the digests
cf.write(classOutputStream);
classOutputStream.flush();
Object[] entry = {outEntry, baos.toByteArray()};
jarEntries.add(entry);
baos.reset();
// Now update the manifest entry for the class with new name and new digests
updateManifest(i, inName, outName, digests);
}
}

这段代码中可以看到 inName 是原始的名字,outName 是经过混淆处理后的名字(没混淆类名就不变,混淆就变),后面还有 classOutputStream是类的字节码内容,是我们想要加密的内容。这个方法的位置太好了,这就是我想要匹配文件,获取字节码内容的地方。

接下来要考虑的是如何配置要对哪些内容进行签名,一开始我想参考 <adjust> 中的 <include> 实现,上面提到过的 as.createEntries(inFilesList) 是一种可行的方式,但是我最后选择了参考 <class> 中的 <patternset>,这也是一种获取匹配类的方式。

准备工作都已经好了,接下来就该动手实现了,此时我还有一个问题,yguard中是如何创建对象的,xml和类是如何结合的,于是我找到了 ant 开发者文档,我们下篇先简单翻译下文档看看ant中的基本规则,磨刀不误砍柴工说的就是现在。


(六)如何基于yGuard实现?
https://blog.mybatis.io/post/8c21ed4a.html
作者
Liuzh
发布于
2024年6月22日
许可协议